Configure Dashboard
Explore Videos for more help:
Videos
The Configure Dashboard helps the user to arrange the dashboard as required.
This includes two dashboards:
- Configure Dashlets
- Configure KPIs
Configure Dashlets
The Configure Dashlets allows administrators to manage the availability and visibility of dashlets on the dashboard for different user roles. Dashlets are individual components that display specific data or functionality, such as documents, users, or key metrics, making the dashboard customizable and role-specific.
Follow the below steps to Configure the Dashlets:
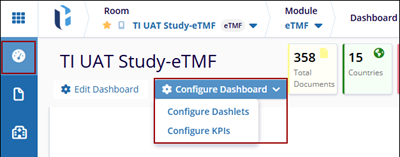
- Click the Configure Dashboard button next to the Edit Dashboard button. The user can see the dropdown menu, Configure Dashlets, and Configure KPIs.
- Click on the Configure Dashlets, and the Configure Dashlets window will pop up.
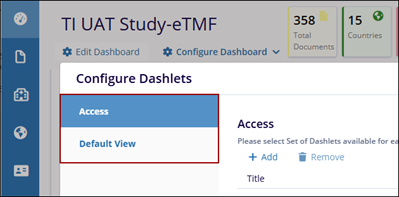
- The Configure Dashlets window will display two tabs on the left:
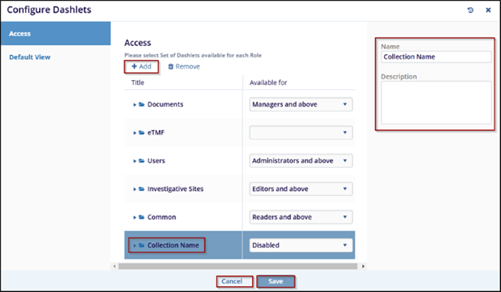
- Access: To select a Set of Dashlets available for each Role
- Default View: To select the Default list of Dashlets for each Role.
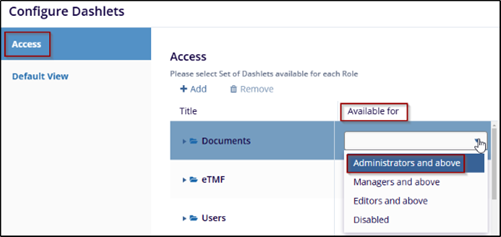
- In the Access tab, the user can select the roles from the dropdown menu under the
Available for the column to assign dashlets to specific roles.
- Click the Remove button to initiate the removal process. A confirmation
window will appear with the message: Are you sure that you want to remove the
collection? Also, the user can only remove the newly added fields and not the
pre-defined fields.
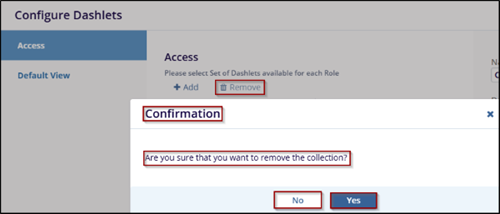
- Click Yes to confirm and remove the collection or click No to cancel the action and keep the collection.
- Click on the Add button, and a new entry will appear under the list of
available dashlet as (Collection Name). While adding a new dashlet, the user has to
mention the Name and Description in the right-side fields.
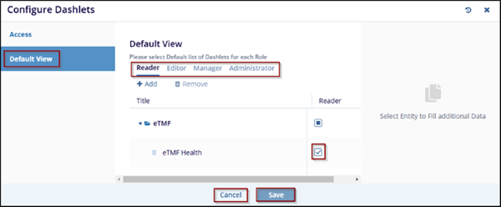
- Switch to the Default View tab, and select the required and appropriate checkboxes for the roles mentioned – Reader, Editor, Manager, and Administrator.
- Click on the Save button at the bottom of the popup window, to save the
changes or click Cancel to discard your changes.
Configure KPIs
The Configure KPIs allow administrators to manage the key performance indicators (KPIs) displayed on the user dashboard. It enables role-based customization of KPI metrics, ensuring that users see the most relevant data based on their responsibilities.
Follow the below steps to Configure KPIs:
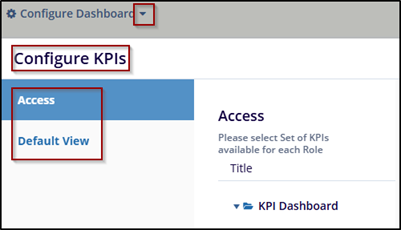
- Click the Configure Dashboard button. The user can see the dropdown menu, and from that, click on Configure KPIs. A new window will pop up.
- The Configure KPIs window will display two tabs on the left:
- Access: To select a Set of Dashlets available for each Role.
- Default View: To select the Default list of Dashlets for each Role.
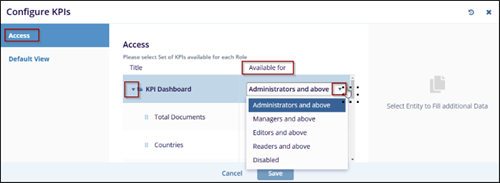
- By default, access is selected, expand the KPI Dashboard fields using the
arrow and select the roles from the dropdown menu under the Available for the column
to assign dashlets to specific roles.
- Switch to the Default View tab, and select the required and appropriate checkboxes
for the roles mentioned – Reader, Editor, Manager, and Administrator.
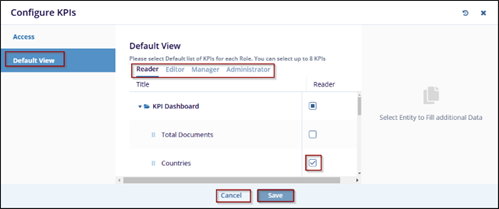
- Click on the Save button at the bottom of the popup window, to save the changes or click Cancel to discard your changes.
- The selected tabs are displayed on the top right of the screen.

-
The entities have been explained below:
Entities Descriptions Countries Displays the total number of countries configured within the room. This metric is available for eTMF and Collaborate rooms. Pending Sites Indicates the number of investigative sites that are not yet active. This metric is available for eTMF and Study Start-Up rooms. Active Sites Represents the number of active investigative sites within the room. This metric is available for eTMF and Study Start-Up rooms. Expired Documents Displays the number of documents that have passed their expiration date. A document is considered expired if its expiration date is earlier than the current date. This metric is available for eTMF, Study Start-Up, Collaborate, and TI Docs rooms. Total Documents Shows the total number of documents available across all modules within the room. Deleted, purged, or missing documents are excluded from this count. This metric is available for all room types. Collected Documents Indicates the number of documents marked as required and successfully collected for the eTMF. This metric is available for eTMF and Study Start-Up rooms. Missing Documents Displays the number of required documents that have not yet been collected. This value is calculated as the difference between the total number of required documents and those already collected. It includes placeholders without any associated collected documents. This metric is available for eTMF and Study Start-Up rooms.
In the corresponding grid, users can view placeholders that still require document submission, as well as submitted documents that are not yet considered collected. A single placeholder may have multiple submitted documents, which can result in differences between the KPI count and the grid display.
Required Coding Represents the number of non-final documents currently in workflow. Documents that are rejected or excluded from the workflow are not included. This metric is available for eTMF and Study Start-Up rooms with workflow enabled and is visible to Editor-level users and above. Final Documents Displays the number of documents with a status of Final, whether submitted directly as Final or published through workflow. This metric is available for eTMF and Study Start-Up rooms with workflow enabled. Expiring Documents Indicates the number of documents approaching expiration. The expiring period is configurable at the room level via Room Settings. This metric is available for eTMF, Study Start-Up, Collaborate, and TI Docs rooms. Open Queries Shows the number of queries with a status of Pending or In Progress. This metric is available for all rooms with the Queries feature enabled. eSignature Requests Displays the number of documents sent to the eSignature workflow stage that are yet to be signed. This metric is available for Collaborate and TI Docs rooms with eSignature enabled. eSignature In Progress Indicates the number of documents currently undergoing the eSignature process. This metric is available for Collaborate and TI Docs rooms with eSignature enabled. Periodic Review Represents the number of documents that require periodic review. This metric is available for Collaborate and TI Docs rooms with eSignature enabled and is visible to Editor-level users and above. Rejected Documents Displays the number of documents with a Rejected status in the room. Selecting the Rejected icon opens a window listing all rejected documents. Users can navigate directly to a document by clicking the corresponding arrow icon.
